Tips for taking better photos
Part one of a two-part series about photography and handling of digital photos

Whether you are using a fancy camera and trying to get artistic scenes, or just capturing moments with a smartphone, some basic principles of photography are universal. Understanding them can make your photos more effective for life and ministry.
Our eyes are like cameras but much more dynamic—they are constantly changing what they are looking at, adjusting the pupils to different light levels, and making the lenses focus at different distances. And our brains can do even more with those images. But a photo is a flat, rectangular recording of the light coming in at one moment, so not all of it will be at the right light level or focus. That’s okay, but to get the best photo, it helps to know what’s going on inside your camera. Each section of this article has both explanations and tips, so don’t let the terms scare you off.
I first learned these concepts in a college photography course in the 1980s when I had to develop my own film. But digital photography is instant and free, so I encourage you to try out these concepts and learn by seeing what happens.
Light affects everything

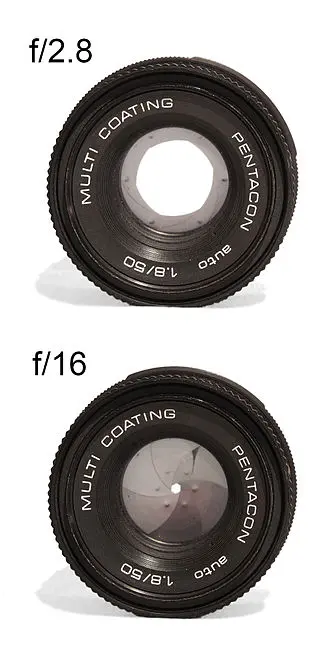
Everything about both vision and photography is based on the light that hits each location on our retinas or each pixel on our camera’s image sensor. Two things in a camera control how much light hits the sensor: the aperture (like the pupils in our eyes, making a bigger or smaller hole for the light to come in) and the shutter speed (the length of time the sensor records light). In addition, the sensor itself can adjust how it records the light it receives, which is commonly called ISO. In digital cameras (including cameras in phones), all these things are normally automated, but it’s not magic—you can improve the odds of getting the shot you want with a little awareness.
When in bright sunlight, there is plenty of light to have a fast shutter speed to catch motion and a small aperture so that more is in focus (called “depth of field”—more on that later). But when you’re indoors or in other dark conditions, do you prioritize shutter speed or aperture? Auto mode will try to strike a balance, but that might not be what you want. You’ll care more about shutter speed if your subject is moving or the aperture if focus is critical. Higher ISO might seem like the way to get both, but the resulting image will have more grainy noise instead of smooth colors because the camera software has to guess the color of each pixel using less information. Pro cameras have large sensors that can better capture light even at high ISO, but the sensors in phones are tiny, making this kind of noise a real problem. So get as much light on the subject as possible, by having a window behind you, turning on more lights, or whatever you can do. Flash should only be a last resort because the result won’t look natural.

Most cameras’ default auto mode will typically adjust the exposure and color balance to make the average of the whole photo “middle gray.” This means it might let you down if the subject you most care about is only a small part of the overall photo (e.g., a skier surrounded by snow or fireworks at night) or there is a predominant color you don’t want neutralized (e.g., a sunset). Your camera should have an option to manually increase or decrease the exposure—it’s usually shown as +/- numbers (you’d want plus numbers for the skier example and minus for fireworks). Manually choosing the white balance (daylight, fluorescent, etc.) might also be helpful. Learn where these adjustments are in your camera.
If you’re trying to get clarity in both light and dark areas, a feature called HDR (high dynamic range) can help—it will take multiple photos very quickly and then combine them to use more exposure in dark areas and less in light areas, like the professional example below (HDR in amateur devices isn’t this good, but it’s better than nothing). Your phone might turn on HDR automatically when there is a lot of contrast in the scene. But HDR can’t do miracles and should only be used if the subject isn’t moving.

Focus and depth of field
Our eyes can’t keep all distances in focus at once—that’s not how lenses work. Eyes quickly adjust their internal lens to stay in focus as we look at objects at different distances, and our brain puts it all together, but a camera has to choose just one focus for each photo. AI might look for faces, but otherwise the camera will focus on the center of the frame (if you see a box in your viewfinder, that’s where it’s trying to focus). If that’s not what you want, you can specify the focus spot. On most phones, simply touch the spot on the screen you want to be in focus, wait for it to focus there, then touch the shutter button. On a camera with a physical shutter button, aim the center of the frame on the point of interest and press the shutter button halfway and hold, then point the camera where you want and press the shutter button all the way down.

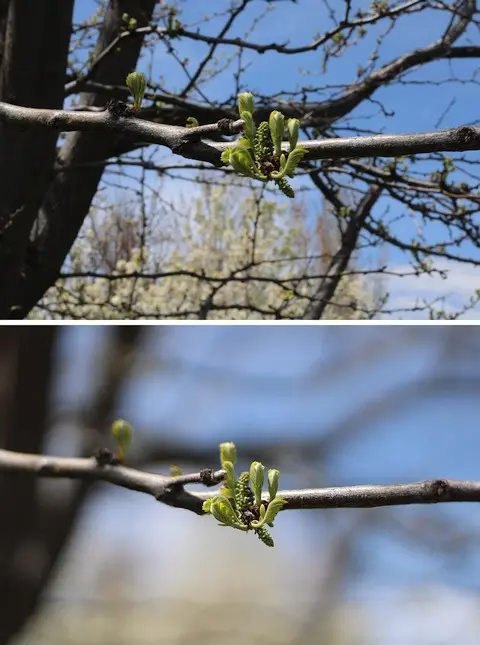
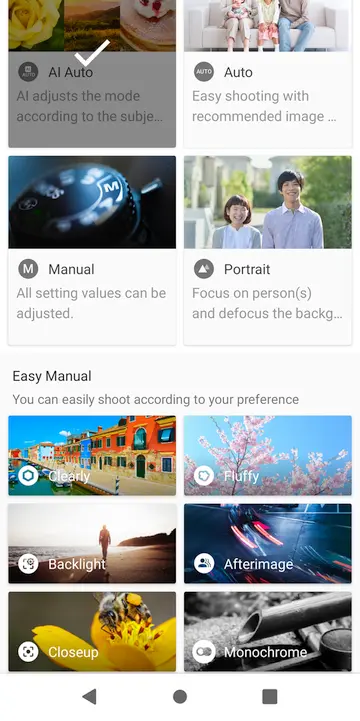
The difference between the nearest and farthest distances that are in focus is called depth of field. The aperture has a dramatic effect on depth of field—a tiny aperture doesn’t let in much light, but many more of the objects at different distances will be in focus. Most of the time that’s good, but it depends on what kind of photo you want. See these two photos of the same scene—one shows much more of all the trees, and the other blurs the background to draw the viewer to look at just one tree bud. If you are shooting a room full of people at a ministry event, you’d want the biggest depth of field possible, but a small aperture means you’d need a longer shutter speed for the same amount of light, so you have to make choices. The default shooting mode on your camera is probably full auto (even “AI auto” on a phone), but there should be other shooting modes you can use for more control:
- Aperture priority: You set the aperture, and the camera chooses the shutter speed. This is good if you want to control the depth of field higher or lower than auto is giving you.
- Shutter priority: You set the shutter speed, and the camera chooses the aperture. This is good if you have a fast-moving subject (e.g., sports) and you want to minimize blur.
- Full manual: You set everything! Not for the faint of heart.

“Scenes” and AI
Having said all this, cameras designed for non-professionals also offer a selection of what are often called scenes, like “sports” or “sunset,” that will do some of this compensation for you. Every manufacturer will use different scene names, but now that you know the mechanics, you can probably guess what each scene will do, and then you can try them and see if they’re useful. This article describes a few examples: https://www.picturecorrect.com/digital-camera-scene-modes
Phones have gone even further with their AI. Some automatically apply a scene when it seems applicable, and apparently some will even alter reality to give you what they think you want!1
Composing/framing your photo
When aiming the camera or phone, a little thought can make the photo much more appealing, perhaps even artistic. The first point is really simple: think about whether the subject will look best in a vertical or horizontal photo, and hold your camera or phone accordingly. Curiously, it seems that most people tend to hold phones horizontally to take still photos but vertically to take video—I don’t know why. Anyway, just stop and think before you shoot.
If you are using a camera with a zoom lens so you can change the focal length (wide vs. narrow view), use it to fill the frame with only what you want. If you don’t have a zoom lens, use your feet—get closer if the situation allows. Note that “digital zoom” is not real zoom—it doesn’t change the focal length, so you won’t get any more detail of distant objects. It’s the same as cropping a small piece of a photo and then inventing additional pixels that the camera didn’t really see, which just makes the file bigger. I don’t use digital zoom—if I don’t have a zoom lens, I either move closer or crop the photo later to get rid of unnecessary background. Since phones are too small to have real zoom lenses, many have second/third cameras at different focal lengths that kick in when you “zoom,” but often those extra cameras are lesser quality.
Here is a page with many more great composition tips and visual examples of each. It is focused (no pun intended) on art photography, but any photo can benefit:
https://photographypro.com/composition
In part two, I’ll share tips about handling digital photos after you have taken them. Stay tuned!
1. This video by Marques Brownlee was made in December 2021 but was already mind-blowing then: https://youtu.be/MZ8giCWDcyE
Images:
https://commons.wikimedia.org/wiki/File:Apertures.jp
https://photographylife.com/what-is-iso-in-photography (used with permission)
https://en.wikipedia.org/wiki/Depth_of_field
https://en.wikipedia.org/wiki/File:HDRI-Example.jpg
https://en.wikipedia.org/wiki/File:Old_saint_pauls_1.jpg
Screenshot submitted by author
