Zoom: a crash course
A mini-tutorial to help us all be more effective with this online communication tool

“Why can I only see one person at a time?”
“You said you put something in ‘chat’—where’s that?”
“How can I use breakout rooms?”
“Music sounds terrible on Zoom—can that be fixed?”
I have heard these questions many times since Zoom became a common tool for church-related meetings. I use Zoom frequently to guide people through activities on their computer, because its screen sharing is more flexible than Skype. I also get asked on Zoom for help with Zoom itself. It is designed to be easy to use, but anything with lots of features can be confusing.
There are other video conferencing apps—Skype, Google Meet, WebEx, etc. But Zoom is by far the most popular and, in my experience, the most reliable.
Zoom 101: Joining a meeting
Every Zoom meeting has a host (who starts the meeting) and one or more other participants. If someone invites you to join a Zoom meeting, they will provide an invitation link like this: https://us02web.zoom.us/j/{some-numbers}. Simply click/tap it to open it in your web browser, and that will start your Zoom app for you (if the app is not installed, it will guide you through installation). You might need to respond to prompts to allow the app to use your device’s mic and camera, but that’s it.
Your host’s invitation might also include a Meeting ID and Passcode, which can be entered in the Zoom app manually, but it’s the same information as in the link. Contrary to popular belief, you can use the link on most smartphones just like on a computer.
If you have joined the same meeting before, you can also open Zoom, click “Join,” then click the symbol next to the Meeting ID field to pick from a list of recent meetings.
Either before or after joining, you can change what name appears with your face during the meeting. If you aren’t logged into an account, your name will initially be something generic, like your device model—it’s polite to change it to your actual name (or whatever the meeting leader requests).
Zoom 102: Participating
Once you’re in the meeting, the most important things are the view mode and the controls.

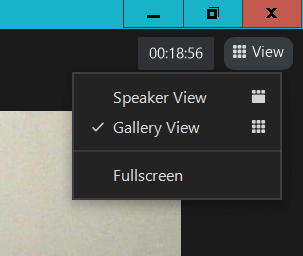
There are two view modes: Speaker View and Gallery View. In Speaker View, the person who is talking is shown in a large box and others either in very small boxes (computer) or not shown (phone). In Gallery View you see a grid with multiple people on the screen—up to 25 people on a computer and up to 4 on a phone.
On a phone, Zoom typically starts in Speaker View, which sometimes confuses new users. To change to Gallery View, swipe the screen to the left. If there are more than four people, keep swiping to see more “pages” of people. To switch views on a computer, click the “View” icon in the top right corner.

The controls are icons along the bottom of the app’s display (on a phone, you might need to touch the screen for them to appear). If not all the icons fit, you’ll see a “More” icon on the right. These are most commonly used:
- Mute/unmute: Change whether others can hear you or not.
- Stop/start video: Change whether others can see you or not.
- Participants: View a list of everyone in the meeting.
- Chat: Send messages to everyone or to one person. See all the messages sent to you. You can even send/receive files.
- Reactions: Show an emoticon for a few seconds next to your face.
In addition, on computers, some icons have a little next to them—each opens an additional menu with related options. (On phones, everything else is on the More menu.)

Zoom 201: Hosting a meeting

(as seen on Android phone)
You don’t need a Zoom account to participate, but you do in order to host a meeting. A free Zoom account lets you host meetings with one other person (e.g. discipleship, counseling, or just a chat) for any length of time, and meetings with more people for up to 40 minutes. Meetings started by someone with a paid (Pro) account are unlimited in duration, even if the Pro account holder makes someone else the host and leaves the meeting.
If you host a similar type of meeting regularly (e.g. Bible studies or committee meetings), rather than using your Personal Meeting ID, click “Schedule”, enter an appropriate topic (you can ignore the date/time), and check the “Recurring meeting” checkbox. Save the meeting and use it over and over. The topic label is also helpful for clarity if you view reports on the Zoom website of all the meetings you’ve hosted.
For conferences or other large meetings, the host can create breakout rooms—places where small groups can talk. Small groups return to the main room when the host closes breakout rooms or the people return on their own. The host can either assign people to rooms or let them choose rooms. You can watch or read tutorials for more on this.
Zoom 301: Share Screen
Another control function is the green button in the bottom-middle called “Share Screen”—it deserves a little more explanation. Hosts can always share, and they can choose whether to allow others in the meeting to share. This function shows other participants your device’s screen—good for PowerPoint, videos, photos, and even getting help with a computer issue.
When you click “Share Screen,” the next popup lets you choose what you want to share: your whole screen, a specific application window, a “whiteboard,” or other options. On a computer, the selection popup also has two checkboxes: “Share sound” (necessary for audio or video) and “Optimize for video clip” (important for video). Once you start sharing, if you’re on a computer, the area being shared will have a colored border to remind you what the participants are seeing. Zoom controls and participant faces will become floating bars that are only visible to you, and you can slide them around if they are in your way.
While sharing, you can also annotate (on a phone, it’s a pencil icon on the bottom left). This allows you to draw, highlight, add text, etc.—great for teaching! Viewers can also draw on the same screenshare unless the person sharing the screen prevents it. At any time, you can undo, erase, or clear drawings.

When someone else is sharing, the computer app will show the participant faces in small size to the right. If you want to see less of the shared screen and more participants, you can drag the boundary between shared screen area and participant area to adjust sizes. On a phone, you can’t see both areas at once, but you can swipe to switch between areas.
Tuning your Zoom experience
I cannot describe all the available settings in this short article, but you can explore on your own. Some settings are found in the Zoom app: click on your profile pic/initials in the top right corner and select “Settings” (on a phone, look for a icon at the bottom right). You will find loads of additional settings on the Zoom website in your profile area (https://zoom.us/profile/setting). I highly recommend that you take time to look at the options and set them as you please.
Here are two lesser-known but helpful settings:

- If you play an instrument or sing over Zoom, in Settings -> Audio, check the checkbox “Show in-meeting option to enable ‘Original Sound.’” Then when you want to play music, click “Original Sound” in the upper left corner to disable noise suppression and other effects that are helpful for normal talking but not for music.
- When joining meetings on a phone, you have to manually connect your audio every time. If you find that annoying (as I do), go to Settings -> Meeting -> Auto-Connect to Audio, and change from “Off” to “Call Over Internet.”
I have just scratched the surface, but you can learn by experimenting or checking online tutorials. This pandemic will not be here forever, but if it has taught us anything, it’s that online communication can be an effective option for some aspects of ministry. Tools like Zoom are here to stay, and it’s worthwhile learning how to use them well.
Caveat: All screenshots and instructions in this article are from the most up-to-date Windows and Android apps. Mac and iOS apps might differ.
Images submitted by author; trademarked images follow guidelines on https://zoom.us/docs/doc/Zoom%20Brand%20Guide.pdf
